HCPP 2023 - Securing the Lunarpunks Workshop
Serinko’s workshop will introduce why and how to use Nym platform as a network protection layer when using some of our favorite privacy applications. This page serves as an accessible guide alongside the talk and it includes all the steps, pre-requisities and dependencies needed. Preferably the users interested in this setup start downloading and building the tools before the workshop or in the beginning of it. We can use the limited time for questions and addressing problems. This guide will stay online after the event just in case people were not finished and want to catch up later.
This page is a how to guide so it contains the setup only, to see the entire presentation join in at HCPP 2023 on Sunday.
Preparation
During this workshop we will introduce NymConnect and Socks5 client. The difference between them is that the Socks5 client does everything Nymconnect does, but it has more optionality and it’s run from a commandline. NymConnect is a one-button GUI application that wraps around the nym-socks5-client for proxying application traffic through the Mixnet.
We will learn how to run through Nym Mixnet the following applications: Electrum Bitcoin wallet, Monero wallet (desktop and CLI), Matrix (Element app) and ircd chat. For those who want to run ircd through the Mixnet, nym-socks5-client client is a must. For all other applications you can choose if you settle with our slick app NymConnect which does all the job in the background or you prefer Socks5 client.
Any syntax in
<>brackets is a user’s/version unique variable. Exchange with a corresponding name without the<>brackets.
NymConnect Installation
NymConnect application is for everyone who does not want to install and run nym-socks5-client. NymConnect is plug-and-play, fast and easy use. Electrum Bitcoin wallet, Monero wallet (desktop and CLI) and Matrix (Element app) connects through NymConnect automatically to the Mixnet.
- Download NymConnect
- On Linux and Mac, make executable by opening terminal in the same directory and run:
chmod +x ./nym-connect_<VERSION>.AppImage
- Start the application
- Click on
Connectbutton to initialise the connection with the Mixnet - Anytime you’ll need to setup Host and Port in your applications, click on
IPandPortto copy the values to clipboard - In case you have problems such as
Gateway Issues, try to reconnect or restart the application
Connect Privacy Enhanced Applications (PEApps)
For simplification in this guide we connect Electrum, Monero wallet and Matrix (Element) using NymConnect and ircd over nym-socks5-client. Of course if your choice is to run nym-socks5-client all these apps will connect through that and you don’t need to install NymConnect.
This guide aims to connect your favourite applications to Nym Mixnet, therefore we do not include detailed guides on how to install them, only reference to the source pages.
Electrum Bitcoin wallet via NymConnect
To download Electrum visit the official webpage. To connect to the Mixnet follow these steps:
- Start and connect NymConnect (or
nym-socks5-client) - Start your Electrum Bitcoin wallet
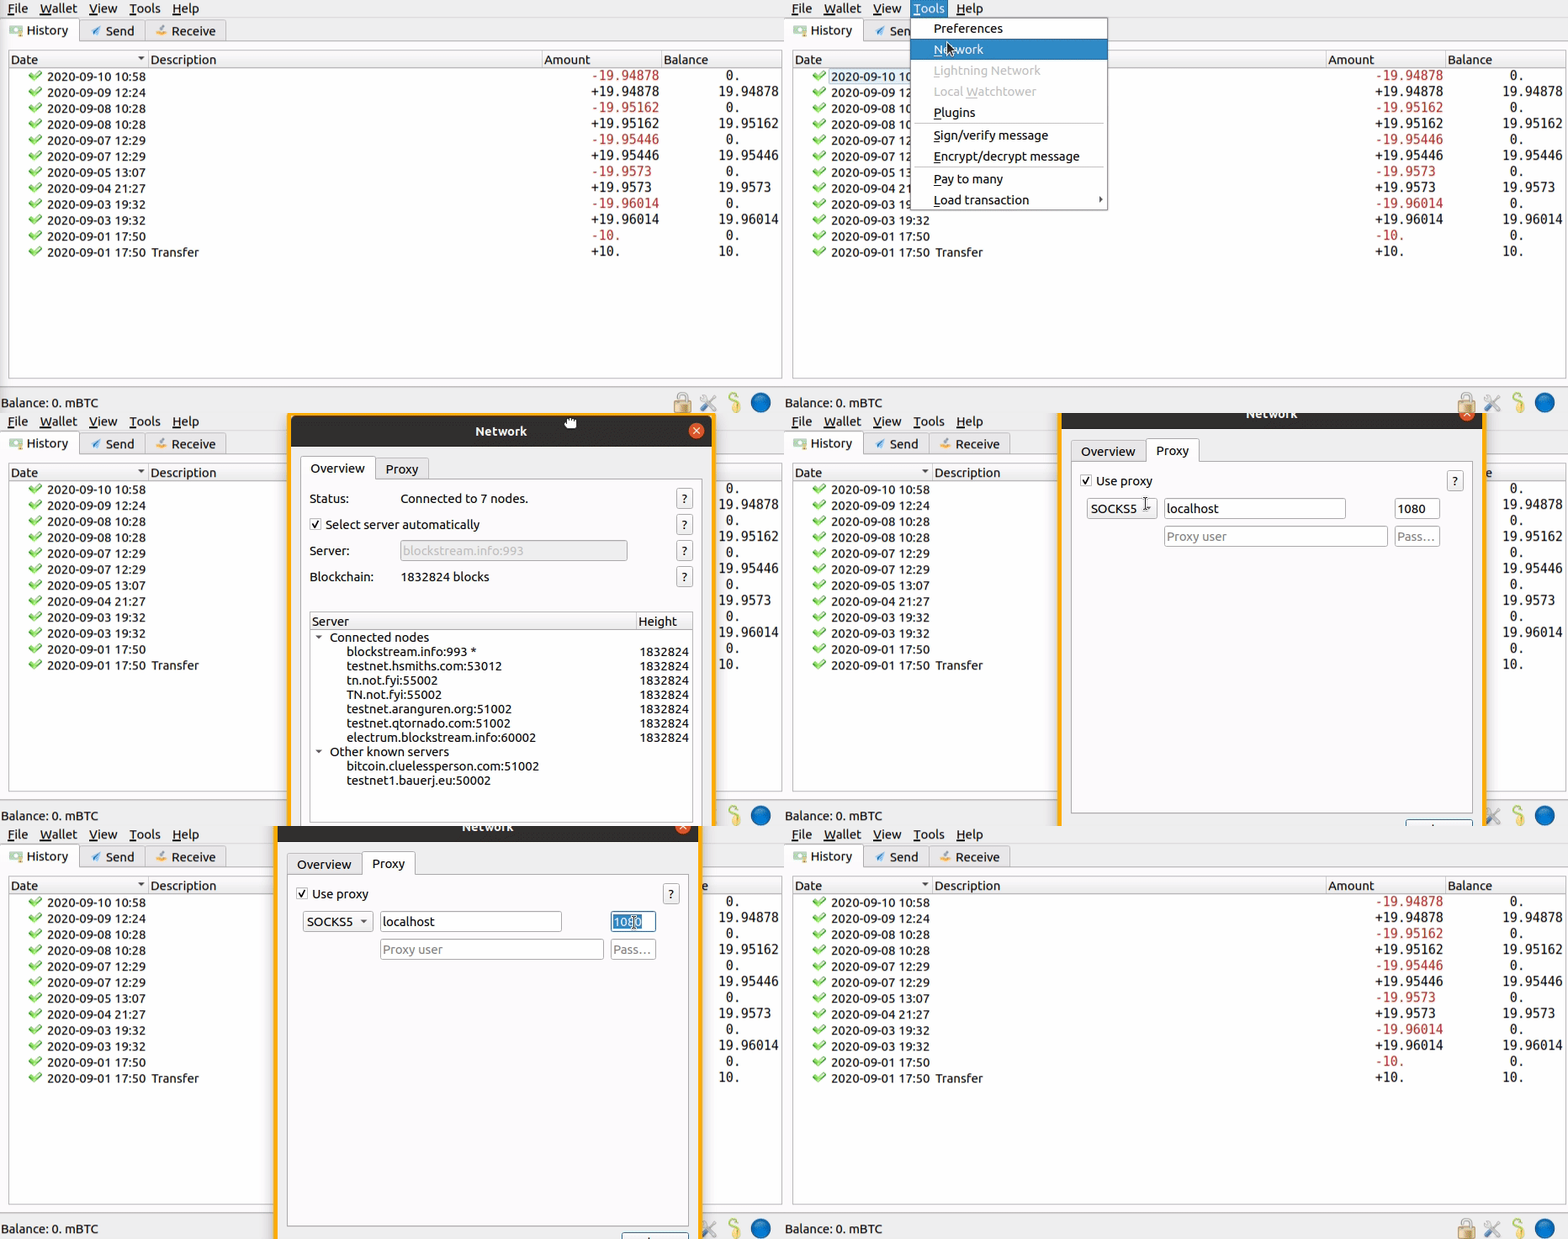
- Go to: Tools -> Network -> Proxy
- Set Use proxy to ✅, choose
SOCKS5from the drop-down and add the values from your NymConnect application - Now your Electrum Bitcoin wallet runs through the Mixnet and it will be connected only if your NymConnect or
nym-socks5-clientare connected.

Monero wallet via NymConnect
To download Monero wallet visit getmonero.org. To connect to the Mixnet follow these steps:
- Start and connect NymConnect (or
nym-socks5-client) - Start your Monero wallet
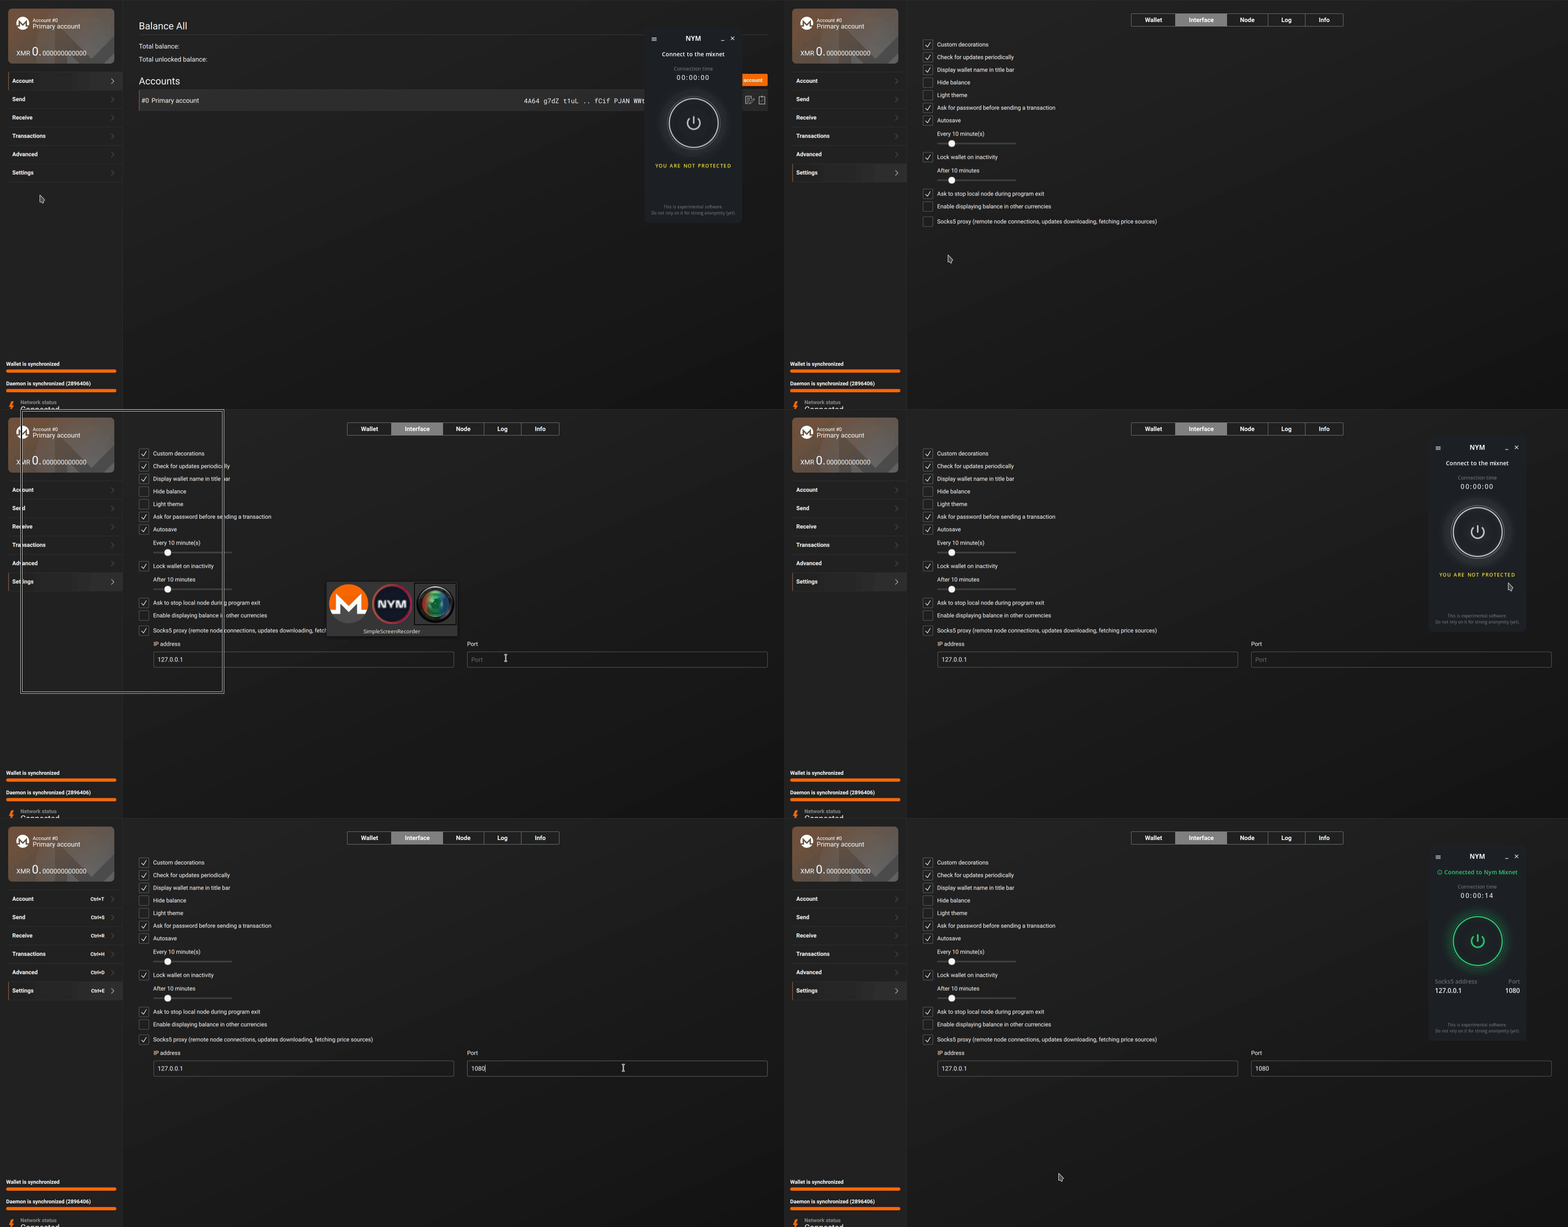
- Go to: Settings -> Interface -> Socks5 proxy -> Add values: IP address
127.0.0.1, Port1080(the values copied from NymConnect) - Now your Monero wallet runs through the Mixnet and it will be connected only if your NymConnect or
nym-socks5-clientare connected.

If you prefer to run Monero-CLI wallet with Monerod, please check out this guide.
Matrix (Element) via NymConnect
To download Element (chat client for Matrix) visit element.io. To connect to the Mixnet follow these steps:
- Start and connect NymConnect (or
nym-socks5-client) - Start
element-desktopwith--proxy-serverargument:
Linux
element-desktop --proxy-server=socks5://127.0.0.1:1080
Mac
open -a Element --args --proxy-server=socks5://127.0.0.1:1080
To setup your own alias or key-binding see our Matrix NymConnect Integration guide.
Building Nym Platform
If you prefer to run to run nym-socks5-client the possibility is to download the pre-build binary or build the entire platform. To run ircd through the Mixnet nym-socks5-client and nym-network-requester are mandatory. Before you start with download and installation, make sure you are on the same machine from which you will connect to ircd.
We recommend to clone and build the entire platform instead of individual binaries as it offers an easier update and more options down the road, however it takes a basic command-line knowledge and more time. The Nym platform is written in Rust. For that to work we will need a few pre-requisities. If you prefer to download individual pre-build binaries, skip this part and go directly that chapter.
Prerequisites
- Debian/Ubuntu:
pkg-config,build-essential,libssl-dev,curl,jq,git
apt install pkg-config build-essential libssl-dev curl jq git
- Arch/Manjaro:
base-devel
pacman -S base-devel
- Mac OS X:
pkg-config,brew,openss1,protobuf,curl,gitRunning the following the script installs Homebrew and the above dependencies:
/bin/bash -c "$(curl -fsSL https://raw.githubusercontent.com/Homebrew/install/HEAD/install.sh)"
Rust & cargo >= 1.66
We recommend using the Rust shell script installer. Installing cargo from your package manager (e.g. apt) is not recommended as the packaged versions are usually too old.
If you really don’t want to use the shell script installer, the Rust installation docs contain instructions for many platforms.
Download and Compile Nym
The following commands will compile binaries into the nym/target/release directory:
rustup update
git clone https://github.com/nymtech/nym.git
cd nym
git checkout master # master branch has the latest release version: `develop` will most likely be incompatible with deployed public networks
cargo build --release # build your binaries with **mainnet** configuration
Quite a bit of stuff gets built. The key working parts for the workshop are:
- socks5 client:
nym-socks5-client - network requester:
nym-network-requester
Pre-built Binaries
The Github releases page has pre-built binaries which should work on Ubuntu 20.04 and other Debian-based systems, but at this stage cannot be guaranteed to work everywhere.
Download: Find the binary of your choice, right click on the binary, select Copy Link. This will save the binary <URL> to clipboard. Run the following commands on your machine:
wget <URL> # to download the binary
If the pre-built binaries don’t work or are unavailable for your system, you will need to build the platform yourself.
All Nym binaries must first be made executable.
To make a binary executable, open terminal in the same directory and run:
chmod +x ./<BINARY_NAME>
# for example: chmod +x ./nym-network-requester
Initialize Socks5 Client and Network Requester
Whether you build the entire platform or downloaded binaries, nym-socks5-client and nym-network-requester need to be initialised with init before being run.
In your terminal navigate to the directory where you have your nym-socks5-client and nym-network-requester. In case you built the entire platform it’s in nym/target/release.
# change directory from nym repo
cd target/release
Network Requester
The init command is usually where you pass flags specifying configuration arguments such as the gateway you wish to communicate with, the ports you wish your binary to listen on, etc.
The init command will also create the necessary keypairs and configuration files at ~/.nym/<BINARY_TYPE>/<BINARY_ID>/ if these files do not already exist. It will NOT overwrite existing keypairs if they are present.
To run ircd through the Mixnet you need to run your own Network Requester and add known peer’s domains/addresses to ~/.nym/service-providers/network-requester/<NETWORK-REQUESTER-ID>/data/allowed.list. For all other applications nym-socks5-client (or NymCOnnect) is enough, no need to initialize and run nym-network-requester.
Here are the steps to initialize nym-network-requester:
# open the directory with your binaries
./nym-network-requester init --id <CHOOSE_ANY_NAME_AS_ID>
This will print you information about your client <ADDRESS>, it will look like:
The address of this client is: 8hUvtEyZK8umsdxxPS2BizQhEDmbNeXEPBZLgscE57Zh.5P2bWn6WybVL8QgoPEUHf6h2zXktmwrWaqaucEBZy7Vb@5vC8spDvw5VDQ8Zvd9fVvBhbUDv9jABR4cXzd4Kh5vz
Socks5 Client
If you run nym-socks5-client instead of NymConnect, you can choose your --provider here or leave that flag empty and your client will chose one randomly. To run ircd, you will need to connect it to your nym-network-requester by using your <ADDRESS> for your nym-socks5-client initialisation and add a flag --use-reply-surbs true. Run the command in the next terminal window:
# to connect to your nym-network-requester as a provider for ircd
./nym-socks5-client init --use-reply-surbs true --id <CHOSE_ANY_NAME_AS_ID> --provider <ADDRESS>

# simple socks5 client init (random provider) for other apps
./nym-socks5-client init --id <CHOSE_ANY_NAME_AS_ID>
You can reconfigure your binaries at any time by editing the config file located at ~/.nym/service-providers/<BINARY_TYPE>/<BINARY_ID>/config/config.toml and restarting the binary process.
Run Clients
Once you have run init, you can start your binary with the run command, accompanied by the id of the binary that you specified.
This id is never transmitted over the network, and is used to select which local config and key files to use for startup.
# network requester
./nym-network-requester run --id <ID>

# socks5 client (in other terminal window)
./nym-socks5-client run --id <ID>
Troubleshooting
In case your nym-socks5-client has a problem to connect to your nym-network-requester try to setup a firewall by running these commands:
# check if you have ufw installed
ufw version

# if it is not installed, install with
sudo apt install ufw -y

# enable ufw
sudo ufw enable

# check the status of the firewall
sudo ufw status

# open firewall ports for network requester
sudo ufw allow 22,9000/tcp

# re-check the ufw status
sudo ufw status
Restart your network requester.
ircd
Dark.fi built a fully anonymous and p2p instance of IRC chat called ircd. The team is just finishing their new instance of the program darkirc which we hope to see in production soon.
It is highly recomended to install dark.fi architecture prior to the workshop following the documentation so we have enough time for the network configuration.
Configuration
Make sure to have ircd installed on the same machine like your nym-socks5-client (nym-network-requester can run anywhere).
Currently nym-network-requester automatically connnects only to the whitelisted URLs. This will change soon into a more opened setup. This list can be changed by an operator running a node.
Edit allowed.list
- Open a text editor and add:
dasman.xyz
- Save it as
allowed.listin~/.nym/service-providers/network-requester/<NETWORK-REQUESTER-ID>/data/ - Restart your
nym-network-requester
./nym-network-requester run --id <ID>
- Make sure both
nym-socks5-clientandnym-network-requesterare running and connected
ircd setup
In case your ircd has problems to start or connect, run the following:
# cd to darkfi repo
git pull
git checkout c4b78ead5111b0423fca3bd53cb7185acd6f0faa

# compile ircd
make ircd

# in case of dependency error: "failed to load source for dependency `halo2_gadgets`"
rm Cargo.lock
make ircd

# remove the config file (rename it if you want to safe any values first)
rm ~/.config/darkfi/ircd_config.toml

# rerun ircd to generate new config file
./ircd

# add your custom values from the old config file
- Open
~/.config/darkfi/ircd_config.toml - Coment the line with
seeds - Add line:
peers = ["nym://dasman.xyz:25552"]
- Change
outbond_transportsto:
outbond_transports = ["nym"]
- Make sure that
outbound_connections = 0
- Save and restart
ircd
Observe the ircd deamon to see that the communication is running through the mixnet.
Bonus: Join hcpp23 channel
Now, when your Darkfi’s ircd runs through Nym Mixnet, you can join public and fully anonymous channel #hcpp23. To do so, follow one of the two possibilities:
- Run a command in your weechat:
/join #hcpp23
- Open
~/.config/darkfi/ircd_config.tomland add"#hcpp23"to theautojoin = []brackets, save and restart ircd.